Traefik is a Reverse Proxy that’s highly-scalable with load-balancing features with support for various providers such as Docker, Kubernetes. The file provider also exists if you do not wish to use Docker/Kubernetes. ACME providers such as Let’s Encrypt through HTTP/DNS challenge is also supported for easy installation of certificates. The DNS challenge is the method to request a wildcard certificate but it requires you to add 2x TXT records to your public DNS records (see your registrar).
The primary reason to use a reverse proxy is when you need multiple hosts (webservers) behind a single public IP. Multiple hosts as in; physical hosts or virtual machines with different local IP addresses. We can’t translate a pre-NAT port e.g. 443 more than once because that port is already translated.
34.34.34.34:443 (Pre-NAT) -> 192.168.10.10:443 (Post-NAT)A simple but terrible solution is translating e.g. port 9001 to 443 but that requires users to enter https://domainname:9001 to reach the given webserver.
Another is example is when some web applications only listen on certain ports e.g. 8080 which you might not be able to change. A reverse proxy removes the need of including the port number in the URL.
Avoid Reverse Proxies if you only intend to serve a few domains (e.g. example.com, subdomain.example.com) on a single physical/virtual host. Instead utilize Apache2’s Virtual Hosts or Nginx’s Server Blocks instead. It’s a lot easier to set up and both of them support Reverse Proxies configurations in the Virtual Host/Server Block files – in case you want to remove the need of entering the port in the URL.
Prerequisites
- Docker and Docker-Compose installed
- Basic knowledge of containers
- Prior experience with Nginx Server Blocks or Apache2 Virtual Hosts helps understanding it better
- A valid domain name
- Webserver is publicly routable in order to receive certificates via the HTTP-challenge method
Terminology used by Traefik
- Providers are either Docker, Kubernetes or file-based.
- An Entrypoint is your front-end Traefik will listen to.
- Services are back-ends like a WordPress/Nextcloud instance.
- Routers connect Entrypoints with Services or in other words the front-end with the back-end. Also it’s the parameter that will define your FQDN (example.com).
- Middlewares adhere to your routers that provide additional functionality such as http-to-https redirecting or HTTP headers like HSTS.
- Dynamic configurations from a provider (e.g. Docker), configurable with a .yaml or .toml file and with the use of labels in a docker-compose file.
- Static configurations such as command-line arguments like “–providers.docker=true” and often referred to as startup-configuration. These will establish a connection with the provider (e.g. Docker)
Traefik’s docker-compose.yml
The idea is that we separate Traefik’s own docker-compose file from the rest like the back-end instances such as WordPress, Nextcloud or Portainer. It’s not necessary, but I find it more modular that way in the sense that it’s “centrally located”. Use nano instead of vi as your text ediot because I found vi to mess up the format after copy pasting. Yaml files are format sensitive. If the file contains unnecessary spaces and such docker-compose will fail to parse it.
$ sudo mkdir ~/traefik
$ cd ~/traefik
$ docker network create traefik
$ sudo nano docker-compose.yml
The network we used for the Traefik Container is just called “traefik” with external access being allowed. Our back-ends are able to communicate with that network.
version: "3.3"

networks:
    # Allow back-ends to communicate with this
    traefik:
        external: true
services:

  traefik:
    image: "traefik:v2.4.8"
    container_name: "traefik"
    restart: always
    command:
      # Only if you want to use the Traefik Dashboard
      - "--log.level=DEBUG"
      - "--api.dashboard=true"
      - "--api.insecure=false"
      # Define Docker as the provider here
      - "--providers.docker=true"
      - "--providers.docker.exposedbydefault=false"
      # The location of where we will store our dynamic file with various configurations possible "on the fly"
      - "--providers.file.directory=/etc/traefik/dynamic"
      # Entrypoint -> is a front-end named "web" on HTTP Port 80
      - "--entrypoints.web.address=:80"
      # Entrypoint -> is a front-end named "web-secure" on HTTPS Port 443
      - "--entrypoints.web-secure.address=:443"
Next, we’ll set up our ACME provider as Let’s Encrypt with HTTP challenges
      # HTTP challenge as our method to acquire SSL certificates
      - "--certificatesresolvers.letsencrypthttpchallenge.acme.httpchallenge=true"
      - "--certificatesresolvers.letsencrypthttpchallenge.acme.httpchallenge.entrypoint=web"
      # Define Let's Encrypt as the issuer
      - "--certificatesresolvers.letsencrypthttpchallenge.acme.email=somemail@mail.com"
      # Location of the acme.json file
      - "--certificatesresolvers.letsencrypthttpchallenge.acme.storage=/letsencrypt/acme.json"
(Optional) The next section is just for Traefik’s own web-interface that has the dashboard for an overview of your routers, entry-points and services. Totally optional though and skip it if you’re concerned with security issues or if you don’t need it. Personally, I don’t find it that useful.
First run the following command to generate a password:
htpasswd -nb someuser somepassMake sure to include it here in the traefik-auth.basicauth middleware.
    labels:
      # Enable the world of traefik here
      - "traefik.enable=true"
      # This will enable SSL
      - "traefik.http.routers.traefik-secure.tls=true"
      # Enable Let's Encrypt HTTP challenge
      - "traefik.http.routers.traefik-secure-secured.tls.certresolver=letsencrypthttpchallenge"
      # Use the web-secure as our entrypoint at 443
      - "traefik.http.routers.traefik-secure.entrypoints=web-secure"
      # The router here is just called traefik-secure and the FQDN rule
      - "traefik.http.routers.traefik-secure.rule=Host(`dashboard.example.com`)"
      # Refer to traefik's dashboard service
      - "traefik.http.routers.traefik-secure.service=api@internal"
      # Either use one of the following two below.
      - "traefik.http.routers.traefik-secure.middlewares=traefik-auth@file"
      #- "traefik.http.routers.traefik-secure.middlewares=homenetwork-ipwhitelist@file"
The following labels should be added for global HTTP -> HTTPS redirections and www.example.com -> example.com
      # Global redirection: http to https
      - traefik.http.routers.http-catchall.rule=HostRegexp(`{host:(www\.)?.+}`)
      - traefik.http.routers.http-catchall.entrypoints=web
      - traefik.http.routers.http-catchall.middlewares=wwwtohttps

      # Global redirection: https (www.) to https
      - traefik.http.routers.wwwsecure-catchall.rule=HostRegexp(`{host:(www\.).+}`)
      - traefik.http.routers.wwwsecure-catchall.entrypoints=web-secure
      - traefik.http.routers.wwwsecure-catchall.tls=true
      - traefik.http.routers.wwwsecure-catchall.middlewares=wwwtohttps

      # middleware: http(s)://(www.) to  https://
      - traefik.http.middlewares.wwwtohttps.redirectregex.regex=^https?://(?:www\.)?(.+)
      - traefik.http.middlewares.wwwtohttps.redirectregex.replacement=https://$${1}
      - traefik.http.middlewares.wwwtohttps.redirectregex.permanent=true
Finally we will define the ports and the volumes where the certificates and dynamic-config file are stored.
    # Specifying the Ports Traefik will listen on
    ports:
      - "80:80"
      - "443:443"
    # The network Traefik will use is just traefik
    networks:
      - "traefik"
    volumes:
      # Docker socket
      - "/var/run/docker.sock:/var/run/docker.sock:ro"
      # Let's Encrypt certificates in ./letsencrypt/acme.json
      - "./letsencrypt:/letsencrypt"
      # Mount the dynamic file configuration
      - ./dynamic-config.yaml:/etc/traefik/dynamic/dynamic-config.yaml
The file should look something like this.
Dynamic file: dynamic-config.yaml
Let’s create our dynamic-config.yaml file and specify the Min and Max TLS values along with strict SNI checking to strengthen our security.
$ cd ~/traefik
$ sudo nano dynamic-config.yaml
Copy paste this content and add any configurations you’ve digged up in the Traefik Docs can be inserted here without needing to reload your instances as it’s a dynamic configuration and not static.
tls:
  ### If you wish to use your paid SSL Certificates from e.g. DigiCert or GlobalSign###
  #certificates:
  #  - certFile: /etc/certs/fullchain.pem
  #    keyFile: /etc/certs/privkey.pem
  options:
    default:
      sniStrict: true
      minVersion: VersionTLS12
      maxVersion: VersionTLS13

    mintls13:
      minVersion: VersionTLS13
    maxtls12:
      maxVersion: VersionTLS12

http:
  middlewares:
    homenetwork-ipwhitelist:
      ipWhiteList:
        sourceRange:
          - 192.168.0.0/24
          - 127.0.0.1/32
    traefik-auth:
      basicAuth:
        removeHeader: true
        users:
          - USER:Hash-Password
    myheaders:
      headers:
        ### HSTS Headers ###
        stsSeconds: 315360000
        forceSTSHeader: true
        stsPreload: true
        stsIncludeSubdomains: true
        ## Other Headers ###
        referrerPolicy: no-referrer
        contentTypeNosniff: true
        frameDeny: true
        sslRedirect: true
        browserXssFilter: true
To start Traefik container:
$ docker-compose up -dPortainer’s docker-compose.yml
First of all, make sure that you do not expose this publicly because if someone gains access to this instance – it’d be all over because significant damage can be inflicted. Instead implement zero-trust least privileges with granular policies. For example; create firewall security policies based on URL category and not just IP addresses and then restrict the source to a local subnet or an address from a single-host machine like your workstation.
We’ll use Portainer 2-0 CE which has a ton of features, such as updating or creating your containers and so much more. Hop we go.
Create a new directory in ~/traefik
$ sudo mkdir ~/traefik/portainer.example.com
$ cd ~/traefik/portainer.example.com
Next, we’ll configure our docker-compose file for portainer
$ sudo nano docker-compose.ymlversion: '3'
networks:
# here we will define the traefik network
traefik:
external: true
# the network for the application backend (portainer) itself
backend:services:
portainer:
image: portainer/portainer-ce
container_name: portainer
restart: unless-stopped
security_opt:
- no-new-privileges:true
networks:
# here we'll specify the traefik and the backend network
- traefik
- backend
volumes:
# Sync Time config
- /etc/localtime:/etc/localtime:ro
# Load Docker sock
- /var/run/docker.sock:/var/run/docker.sock:ro
# Local access portainer contents
- ./portainer-data:/data
labels:
# Enable Traefik and specify the network
- "traefik.enable=true"
- "traefik.docker.network=traefik"
# Web-secure https entrypoint
- "traefik.http.routers.portainer-secure.entrypoints=web-secure"
# FQDN
- "traefik.http.routers.portainer-secure.rule=Host(`portainer.example.com`)"
# Enable TLS
- "traefik.http.routers.portainer-secure.tls=true"
# Enable Let's Encrypt HTTP challenge
- "traefik.http.routers.traefik-secure-secured.tls.certresolver=letsencrypthttpchallenge"
- "traefik.http.routers.portainer-secure.service=portainer"
- "traefik.http.services.portainer.loadbalancer.server.port=9000"
# Limit access to Portainer with IP whitelisting
- "traefik.http.routers.portainer-secure.middlewares=homenetwork-ipwhitelist@file"
To launch Portainer 2.0
The file should look something like this.
docker-compose up -dWordPress’s docker-compose.yml
WordPress depends on a database such as MySQL or MariaDB which we have to configure. Optional dependencies such as Redis for caching purposes can also be added. But to keep it simple, I’ve excluded Redis but if there’s demand for it then I’ll add it. We will also add HSTS headers (Strict-Transport-Security) which will also prevent downgrade attacks. In Traefik it’s falls under the middlewares category. Although it’s optional, your website will score much better at ssllabs.com.
Create a new directory in ~/traefik:
$ sudo mkdir ~/traefik/example.com
$ cd ~/traefik/example.com
And our docker-compose file:
$ sudo nano docker-compose.ymlNetwork configuration:
version: '3'

networks:
  # here we will define the traefik network
  traefik:
    external: true
  # the network for the application backend (WordPress) itself
  backend:
WordPress container configuration:
  wordpress:
    image: wordpress
    restart: always
    environment:
      # Hook WordPress up with MySQL
      WORDPRESS_DB_HOST: mysql:3306
      WORDPRESS_DB_USER: wordpressuser
      WORDPRESS_DB_PASSWORD: password
      WORDPRESS_DB_NAME: wordpressdb
    volumes:
      # save the content of WordPress an enable local modifications
      - ./wordpress/data:/var/www/html # allows for local modifications editing php files etc
    networks:
      # define the traefik and the backend network
      - traefik
      - backend
    depends_on:
        # Enable the MySQL dependency
        - mysql
    labels:
      # Turn on Traefik
      - "traefik.enable=true"
      - "traefik.docker.network=traefik"
      # HTTPS Entrypoint
 and FQDN
      - "traefik.http.routers.wordpress-secure.rule=Host(`example.com`)"
      - "traefik.http.routers.wordpress-secure.entrypoints=web-secure"
      # Enable TLS
      - "traefik.http.routers.wordpress-secure.tls=true"
      # Enable Let's Encrypt HTTP challenge
      - "traefik.http.routers.traefik-secure-secured.tls.certresolver=letsencrypthttpchallenge"
      # Enable HSTS headers and other security headers
      - "traefik.http.routers.wordpress-secure.middlewares=myheaders@file"
The MySQL container.
  mysql:
    # this is the database used by WordPress
    image: mysql:5.7
    restart: always
    environment:
      # WordPress Database
 entries
      MYSQL_DATABASE: wordpressdb
      MYSQL_USER: wordpressuser
      MYSQL_PASSWORD: password
      MYSQL_RANDOM_ROOT_PASSWORD: '1'
    volumes:
      # The database will also be stored in ./db on your local machine and container itself
      - ./db:/var/lib/mysql
    networks:
      # The Traefik network is not needed
      - backend
The file should look like something this.
Finally, start up the WordPress container and browse to https://example.com and make sure the hostname is just “mysql” when configuring the database.
docker-compose up -dNextcloud’s docker-compose.yml
Let’s complete this guide with Nextcloud as our last back-end instance. MySQL is also needed here. Nextcloud needs no further introduction, so we’ll jump straight in it.
Create a new directory for nextcloud
$ sudo mkdir ~/traefik/nextcloud.example.com
$ cd ~/traefik/nextcloud.example.com
And let’s create our last docker-compose file:
$ sudo nano docker-compose.ymlEdit it and let’s start off with our network configuration:
version: '3'

networks:
  # Enable connection with Traefik
  traefik:
    external: true
  # network for the app
  backend:
The Nextcloud container configuration:
services:

  nextcloud:
    restart: always
    image: nextcloud
    environment:
      # Hook Nextcloud up with MySQL
      NEXTCLOUD_DB_HOST: mysql:3306
      NEXTCLOUD_DB_USER: nextclouduser
      NEXTCLOUD_DB_PASSWORD: password
      NEXTCLOUD_DB_NAME: nextclouddb
    volumes:
      # Store the contents of Nextcloud and enable local modifications
      - ./data/volumes/nextcloud/html:/var/www/html
    networks:
      - traefik
      - backend
    depends_on:
        - mysql
    labels:
      # Connect to Traefik
      - "traefik.enable=true"
      - "traefik.docker.network=traefik"
      # Middlewares Caldav
      - "traefik.http.middlewares.nextcloud-caldav.redirectregex.permanent=true"
      - "traefik.http.middlewares.nextcloud-caldav.redirectregex.regex=^https://(.*)/.well-known/(card|cal)dav"
      - "traefik.http.middlewares.nextcloud-caldav.redirectregex.replacement=https://$${1}/remote.php/dav/"
      # Connect Middleware Caldav with Nextcloud-router
      - "traefik.http.routers.nextcloud-secure.middlewares=nextcloud-caldav@docker"
      # Route HTTPS
      - "traefik.http.routers.nextcloud-secure.entrypoints=web-secure"
      - "traefik.http.routers.nextcloud-secure.rule=Host(`nextcloud.example.com`)"
      # Enable TLS
      - "traefik.http.routers.nextcloud-secure.tls=true"
      # Enable Let's Encrypt HTTP challenge
      - "traefik.http.routers.traefik-secure-secured.tls.certresolver=letsencrypthttpchallenge"
      # Enable HSTS Headers and other security headers
      - "traefik.http.routers.nextcloud-secure.middlewares=myheaders@file"
At last, the MySQL container:
 mysql:
    # The database Nextcloud will connect to
    image: mysql:5.7
    restart: always
    environment:
      # Nextcloud Database
 entries
      MYSQL_DATABASE: nextclouddb
      MYSQL_USER: nextclouduser
      MYSQL_PASSWORD: password
      MYSQL_RANDOM_ROOT_PASSWORD: '1'
    volumes:
      # The database will also be stored in ./db on your local machine and container itself
      - ./db:/var/lib/mysql
    networks:
      # The Traefik network is not needed here
      - backend
The file should look something like this.
Run docker-compose:
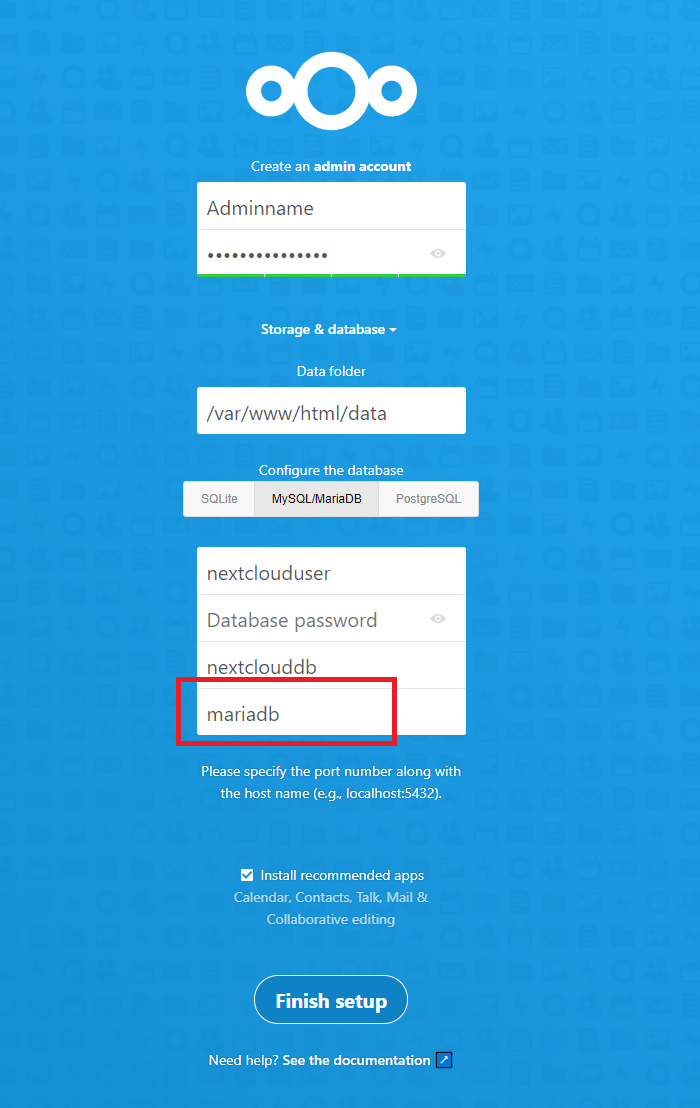
$ docker-compose up -dAs for the database host, replace “localhost” with “mariadb”. Else the installation would fail because it can’t connect to the database.
Conclusion
Traefik is quite hard to learn, especially if you’ve never worked with docker before. Once you get the hang of it, everything starts to make sense as you go along and it doesn’t seem all too complicated. Make sure to check their documentation because it has plenty of valuable configuration examples and explanations.