Minemeld is an open source threat intelligence system that gathers and shares threat indicators and feeds from various sources such as: CERT, ISAC, Palo Alto Autofocus, and from other deployed Minemeld instances. Rather than a manual approach of aggregating and collecting threat indicators, Minemeld is highly automated with an easy-to-use web-interface and excellent visibility. An example would be: mining the IP addresses Microsoft uses for Office365 to create a “External Dynamic List” their NGFW can use.
You do not need a Palo Alto Next-Generation Firewall to leverage the benefits of Minemeld which makes sense as it’s open source.
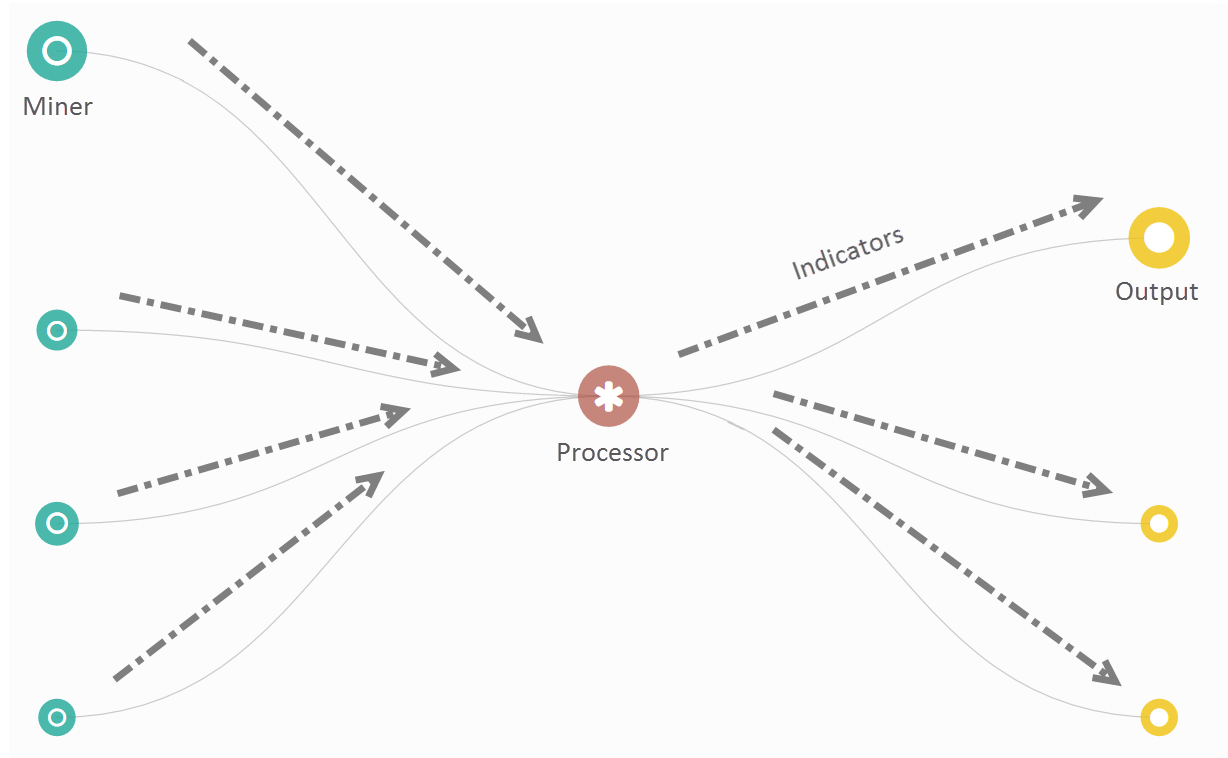
Minemeld components
- A miner is the component that harvests threat intelligence data from various sources. By default we have a few preconfigured miners and we do have the option to add our own custom miner for a specific use-case scenario like Office 365.
- A processor prevents duplicated inputs from the miners entering the output feeds. It sits in-between the miners and the output feeds.
- Output feeds are basically a compiled list of malicious URL’s or IP-addresses. The list can be utilized in a security policy to block traffic going and coming from those malicious URL’s/IP-addresses.
Install Docker and Docker Compose
Docker Compose makes the configuration so much easier with a yaml file where we can put all of our configuration settings. It’s so much easier to keep track on all the configurations we’ve made with a single file, rather than digging into the Docker Client. However, we still need the Docker client. Ubuntu 20.04 will be used, although I’m sure 18.04 will flow equally.
Install Docker:
$ sudo apt update -y && sudo apt upgrade -y
$ sudo apt install apt-transport-https ca-certificates curl software-properties-common
$ curl -fsSL https://download.docker.com/linux/ubuntu/gpg | sudo apt-key add -
$ sudo add-apt-repository "deb [arch=amd64] https://download.docker.com/linux/ubuntu bionic stable"
$ sudo apt update
$ sudo apt install docker-ce
(Optional) To run Docker without entering sudo every time:
$ sudo usermod -aG docker ${USER}
$ su - ${USER}
$ id -nG
Install Docker-Compose:
$ sudo curl -L "https://github.com/docker/compose/releases/download/1.26.0/docker-compose-$(uname -s)-$(uname -m)" -o /usr/local/bin/docker-compose
$ sudo chmod +x /usr/local/bin/docker-compose
Create a new directory that will store the Minemeld contents and the docker-compose.yml file.
$ sudo mkdir ~/minemeld
$ cd mkdir ~/minemeld
$ sudo nano docker-compose.yml
Make sure the format is in place, so no unnecessary spaces or it’ll fail to parse the file. This instance will be with a self-signed certificate.
version: '3.3'
services:
    minemeld:
        container_name: minemeld
        image: paloaltonetworks/minemeld
        restart: always
        tmpfs: /run
        volumes:
            - './minemeld-local:/opt/minemeld/local'
            - './minemeld-logs:/opt/minemeld/logs'
        ports:
            - '443:443'
            - '80:80'
To start the container:
$ docker-compose up -dAlternative, you can define the file to use:
$ docker-compose -f docker-compose.yml up -d(Optional) To prevent the browser warnings we can install SSL certificates issued by a CA. First, let’s create a directory that will store the certificates on the local machine.
$ sudo mkdir ~/minemeld/certificatesUpload the server certificate and the private key to the directory we just made. The intermediate certificates aren’t necessary or a fullchain certificate. Edit your docker-compose.yml file:
$ sudo nano ~/minemeld/docker-compose.ymlCopypaste the following. The certificates will be mounted from your local machine’s certificate directory to the directory “/etc/nginx” residing in the container.
version: '3.3'
services:
    minemeld:
    image: paloaltonetworks/minemeld
        container_name: minemeld
        restart: always
        tmpfs: /run
        volumes:
            - './minemeld-local:/opt/minemeld/local'
            - './minemeld-logs:/opt/minemeld/logs'
            - './certificates/cert.pem:/etc/nginx/minemeld.cer:ro'
            - './certificates/privkey.pem:/etc/nginx/minemeld.pem:ro'
        ports:
            - '443:443'
            - '80:80'
To update it:
$ docker-compose up -dAlternatively:
$ docker-compose -f docker-compose.yml up -dAt this point Minemeld should be up and running. The default credentials are admin & minemeld. Make sure to change the default login and don’t use “admin” as a login name for best practices.
Implement the feeds list to your firewall
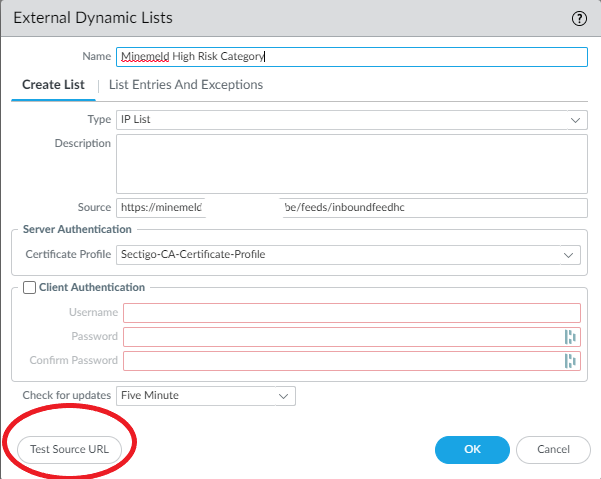
Objects > External Dynamic Lists
We can add an external dynamic list which will contain the output data from Minemeld and drop it in a security policy. It should be updated every few minutes because Minemeld will flag more URL or addresses as malicious. A Palo Alto firewall will be used for this demonstration, but it doesn’t have to be a Palo Alto firewall. It can be utilized by any firewall or any other service.
Enter the FQDN or IP-address of your Minemeld instance. If you use an URL with a certificate issued by a CA, attach the CA’s certificate in a certificate profile.
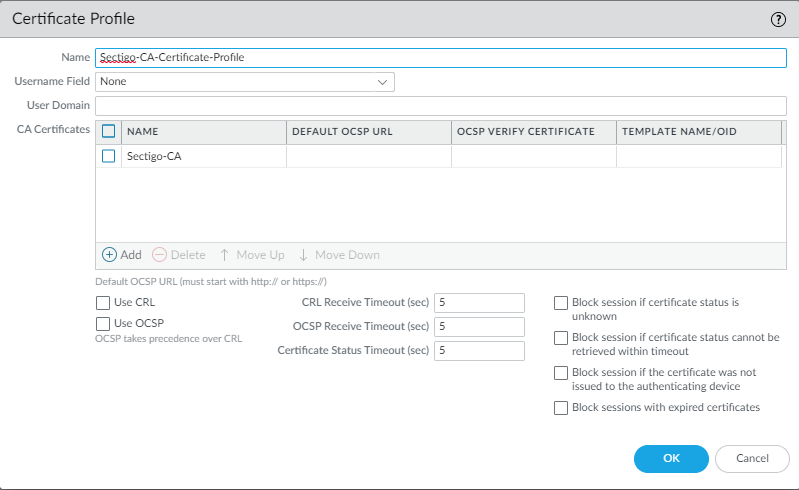
Here’s my example of a certificate profile.
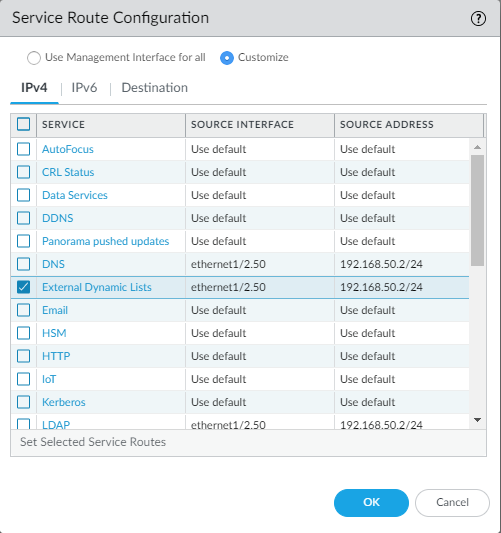
By default, the firewall seems to use the management interface for external dynamic lists. If the Minemeld server isn’t in the same subnet as the management interface then the “source URL test” will fail.
192.168.50.30 is the IP-address of my Minemeld instance and we’re telling the firewall to use ethernet1/2.50 to communicate with Minemeld instead of the management interface.
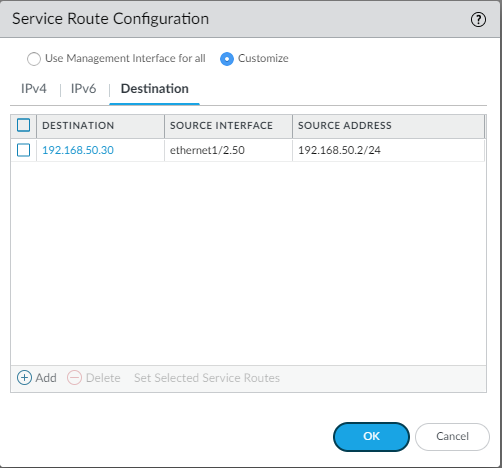
Alternatively you can configure it like this:
Security Policy
Finally, include the external dynamic list in a security policy and the action obviously should be set as “deny”. Below traffic from my local network going out to any of the IP-addresses included in the list are blocked.

For a webserver, include the list in th source addresses tab instead.