The NSX-T builtin firewall is quite refined, but it lacks so much of what Palo Alto Networks and their cloud services have to offer. Traffic can be redirected to a VM-series firewall for inspection with the use of security profiles and it provides more granular control over your policies with App-ID. The NSX-T firewall can be ignored for the most part because security policies are configured in Panorama.
Prerequisites
- NSX-T Manager/Edges up and running
- Palo Alto Networks Panorama
- A support account (support.paloaltonetworks.com)
- VM series auth codes to license the firewall (VM100 series as a minimum)
- HTTP/HTTPS web-server to host the NSX-T signed images
Deployment options
In a service cluster, the VM-series firewalls are installed on a vSphere cluster as a service cluster. We can choose the host that we want to install the firewall or let NSX-T decide automatically. This is by far the most flexible in terms of scaling and a single firewall here is sufficient. Host-based deployments require a firewall per host and that can be quite expensive in terms of licensing. ‘App’, ‘Web’ and ‘Database’ in the following picture represent the ESXI hosts.

In a host-based deployment, VM-Series firewalls are installed per host. The advantage to this deployment type is that traffic that needs to be inspected does not have to leave the host. We won’t be going with this type because as mentioned before, it’s rather expensive and not as flexible.

Topology overview
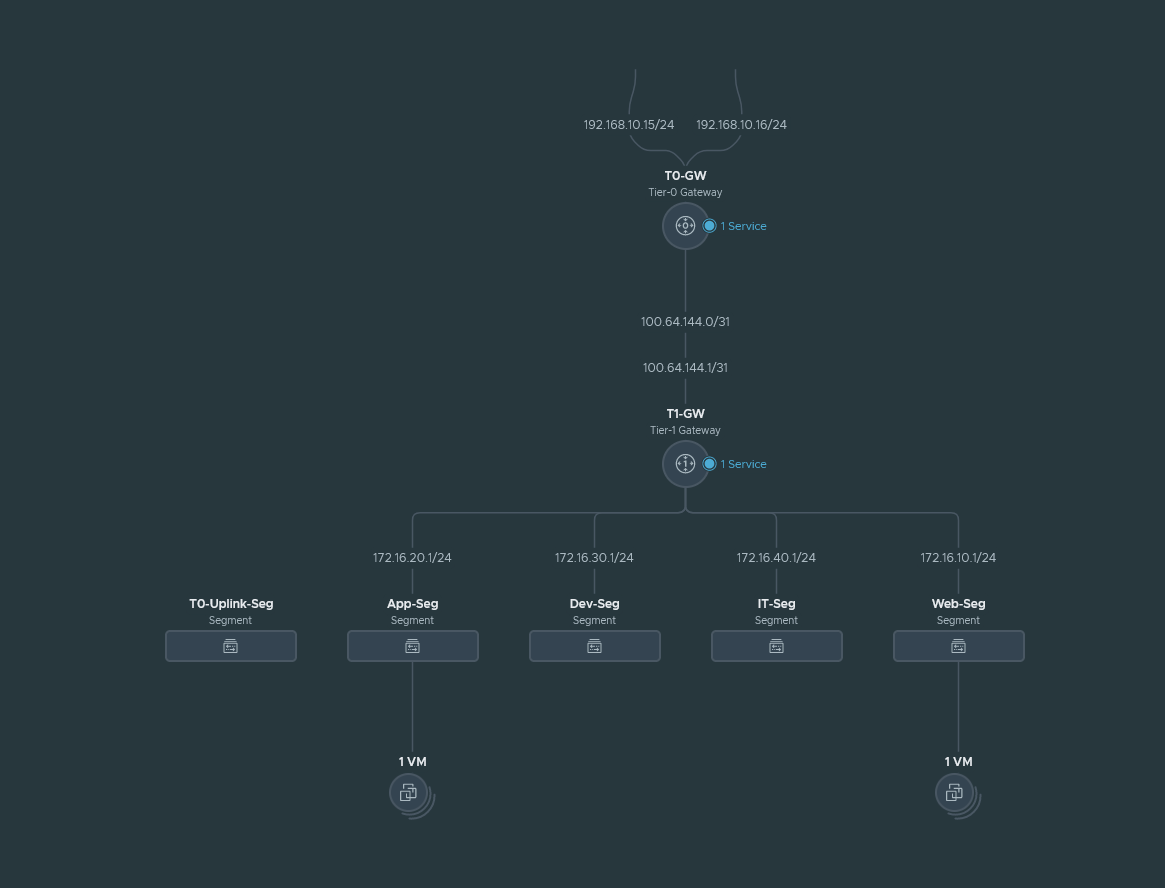
We have 4 segments (App, Web, Dev and IT) behind a T1 gateway and this T1 gateway connects to our T0 gateway. The T0 gateway is behind the upstream router and the local network for it is 192.168.10.0/24. The management address of the VM-Series we are about to deploy will also be in the 192.168.10.0/24 range.
The T0-Uplink-Seg is used for the service interfaces on our T0 gateway that connects to our upstream router.
The East-West Service Insertion will be attached to the T1-GW because we are trying to inspect traffic between our segments and the T1 gateway is responsible for intra-VM traffic. Any traffic that’s not destined for our segments, will be forwarded to the T0-GW and this won’t be inspected by our East-West Service Insertion firewall because it’s north-south traffic.
Installing the plugin and linking Panorama with the NSX-T Manager
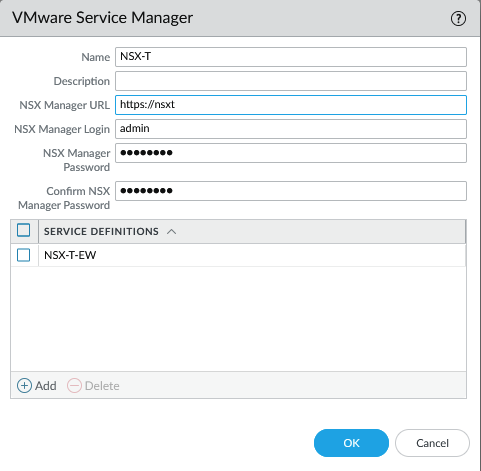
Install the NSX plugin which can be found under Panorama > Plugins and make sure to get the latest version. We have to add a service manager to link Panorama with NSX-T. Panorama > VMware > NSX-T > Service Managers.
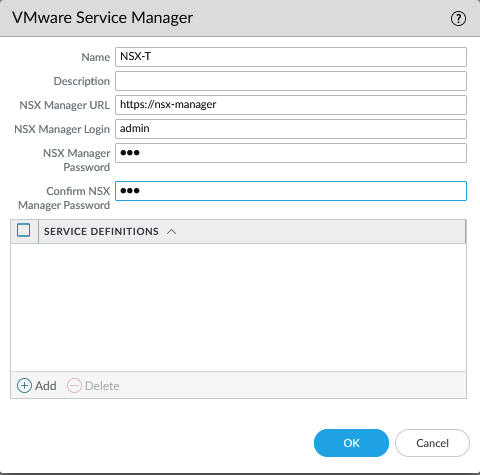
Commit to Panorama. The status should show as ‘Registered’ if successful.
Creating the Device Groups, Template and Template Stacks
Simply create the following.
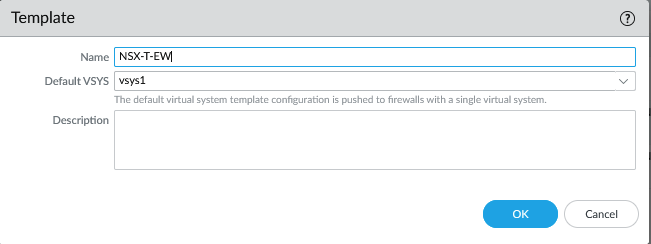
- Template: NSX-T-EW
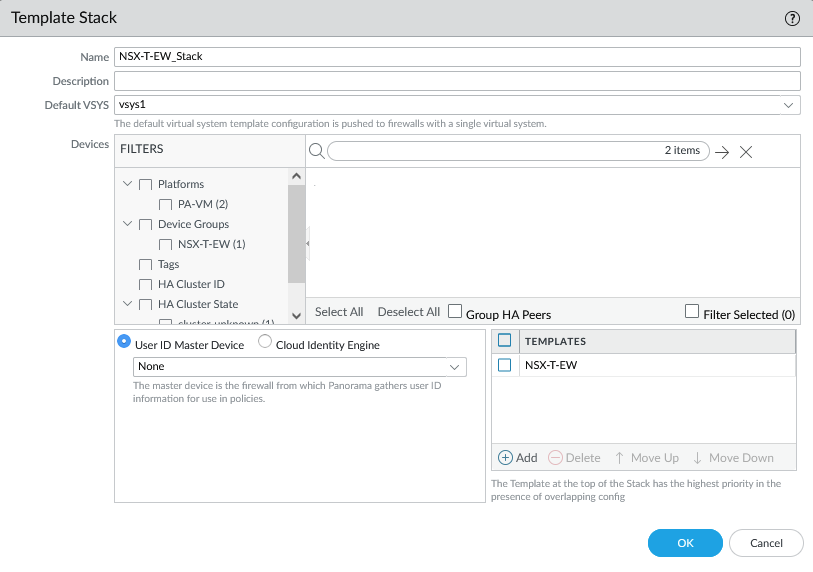
- Template Stack: NSX-T-EW_Stack
- Device Group: NSX-T-EW
The template.
The template stack.
Add the Device Group.

Make sure to add the template and template stack as a reference in the Device Group so that security zones show up in your policies.
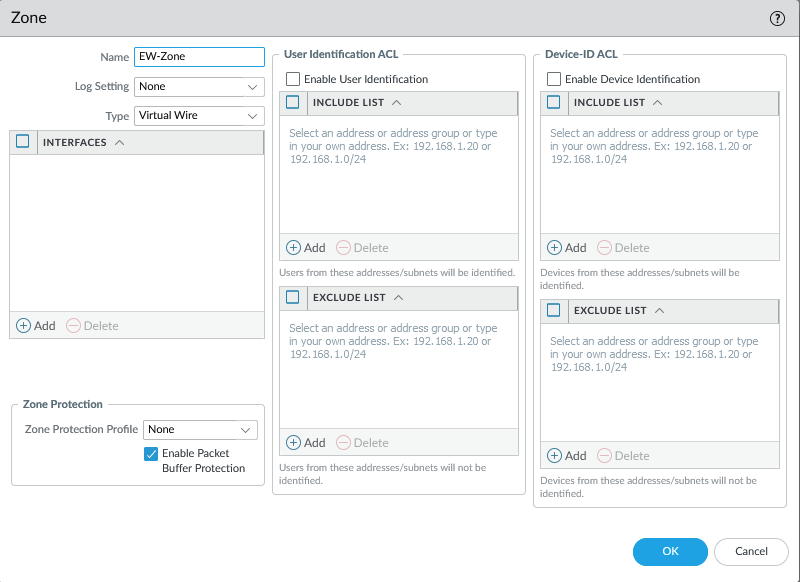
Next add a security zone and give it an appropriate name and select ‘Virtual Wire’ as the interface type. This will later show up as a ‘Service Profile’ and it will be linked to a ‘Service Chain’ under NSX-T > Security > Network Introspection Settings > Service Profiles & Service Chain.
Commit to Panorama.
Configuration the service definition
Configuring service definition
We have to provide a device PIN ID and value starting from certain PANOS versions. On the support page, generate the pair. It’s under Assets > Device Certificates
Copy the PIN ID and the PIN value for later.
Next, we’ll add the service definition. Panorama > VMware > NSX-T > Service Definitions. Make sure the URL hosting the NSX-T images are functional. Select the template, stack and the device group we created earlier. Copy paste the PIN ID and value here as well. Make sure to select the east-west insertion type.
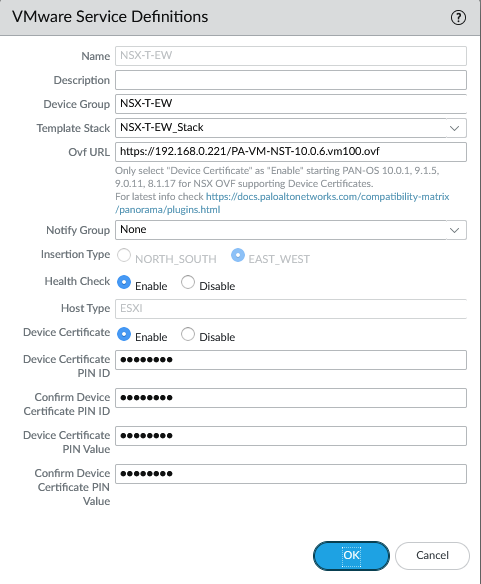
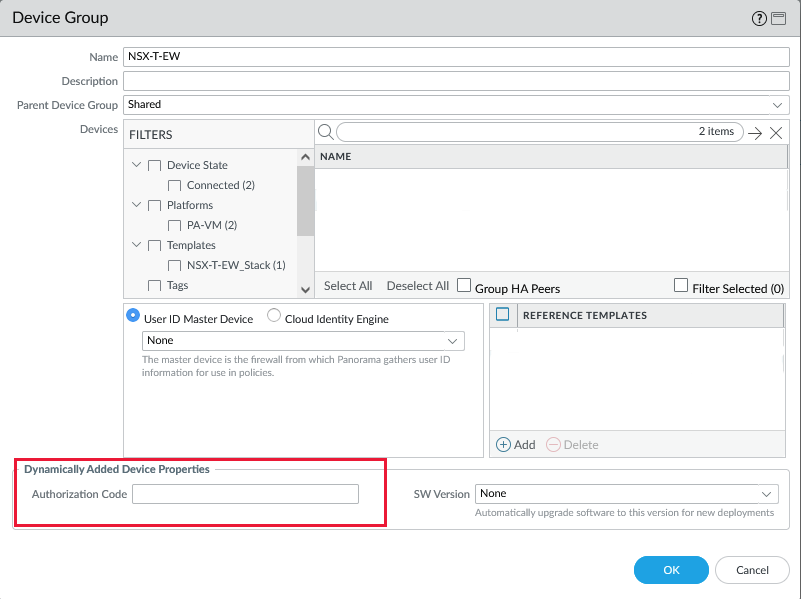
Add your VM-Series auth code on the Device Group level. This step is required or else it will fail to commit the configuration of the plugin.
The last step is to add the service definition to the service manager under Panorama > VMware > NSX-T > Service Managers
Commit to Panorama.
Deploying the VM-Series firewall
Let’s create our service segment first. Security > Network Introspection Settings > Service Segments

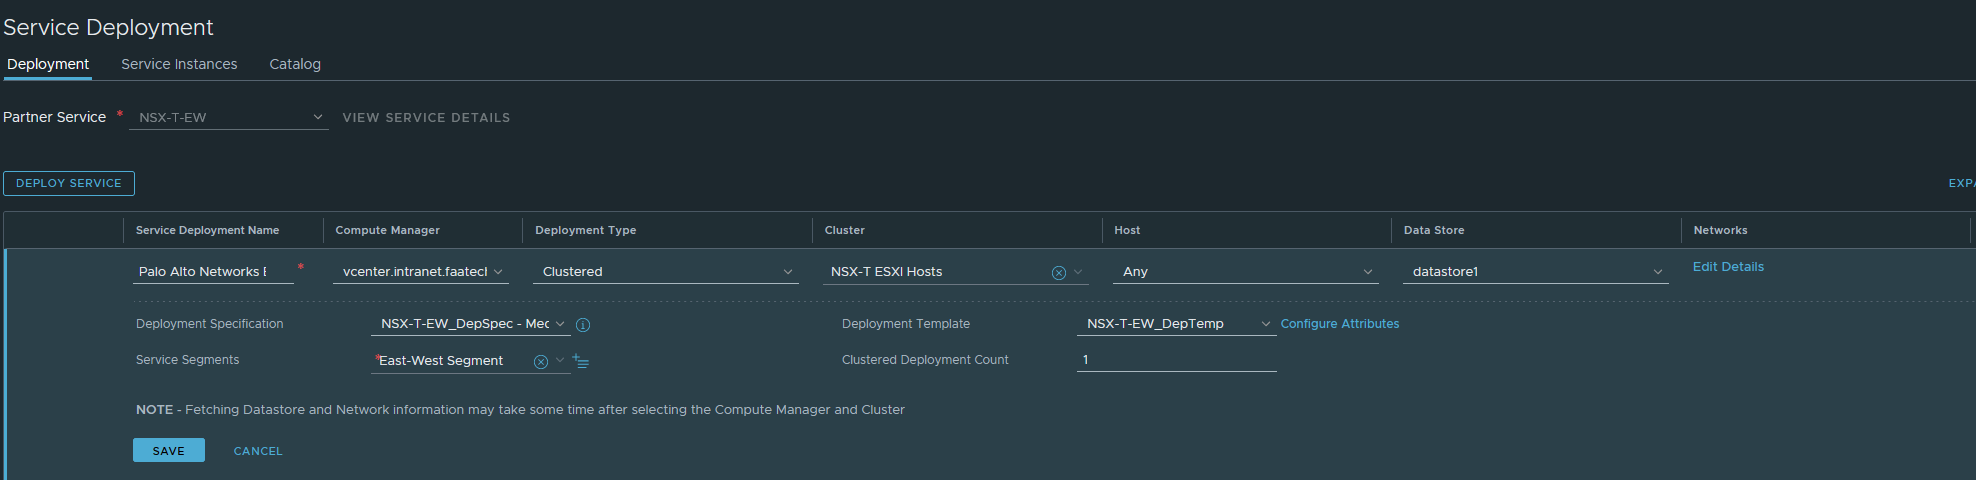
We can deploy the VM-Series firewalls from the NSX-T Manager. Head over to System > Service Deployments. We can see the Partner Service ‘NSX-T-EW’ definition we created earlier in Panorama. Deploying the service requires a few configurations and it’s rather automated at this point. Device certificates/licensing are also automated along with the integration and syncing with Panorama although it’s highly recommended to double-check this.
- Give it a name.
- Select the Compute Manager.
- Select ‘Clustered’ as the deployment type.
- Select the Cluster.
- ‘Any’ of or specify the host. I recommend ‘Any’ to let NSX-T decide.
- Select the datastore.
- Select the ‘east-west service segment’ we created earlier.
- The clustered deployment count is the amount of firewall to deploy.
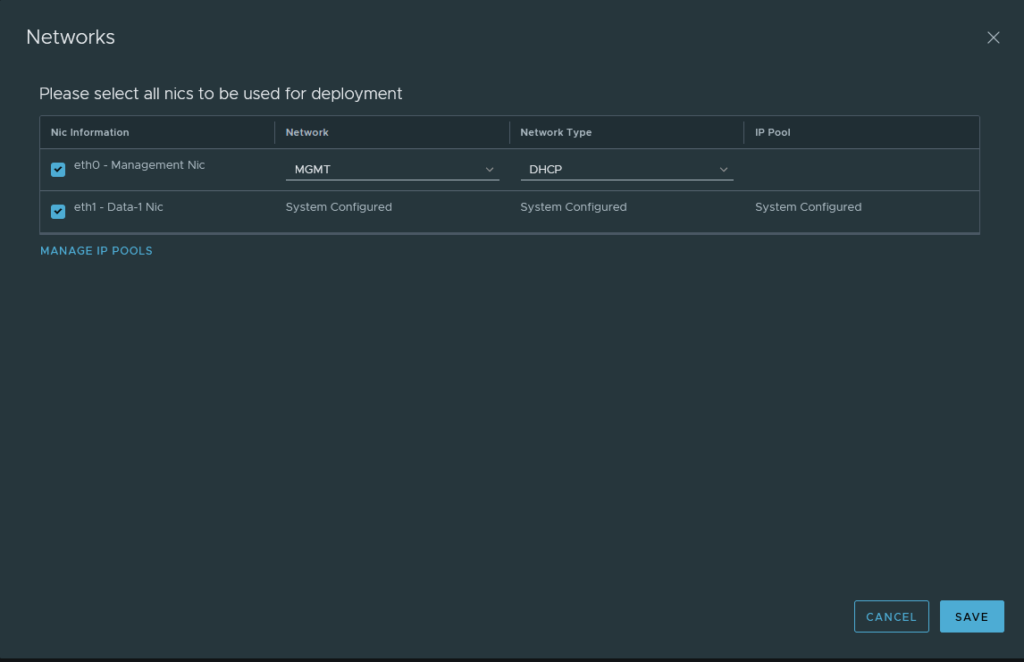
Lastly, configure the management interface for the firewall. Either go with DHCP or a static address and Panorama needs to be able to reach this address, so configure your routes on your physical upstream router appropriately if needed.
Commit. It will take a while before it’s completed.

After it’s complete, make sure the config files of Panorama/VM-Series are in sync before going forward. Panorama > Managed Devices > Health

Overlay segments and groups
I have the following segments:
- Web-Seg: 172.16.10.1/24 tagged ‘Web’
- App-Seg: 172.16.20.1/24 tagged ‘App’
- Dev-Seg: 172.16.30.1/24 tagged ‘Dev’
- IT-Seg: 172.16.40.1/24 tagged ‘IT’

And I did create groups based on the segments/tags.

I have tagged each group with the appropriate tags and the following criteria.
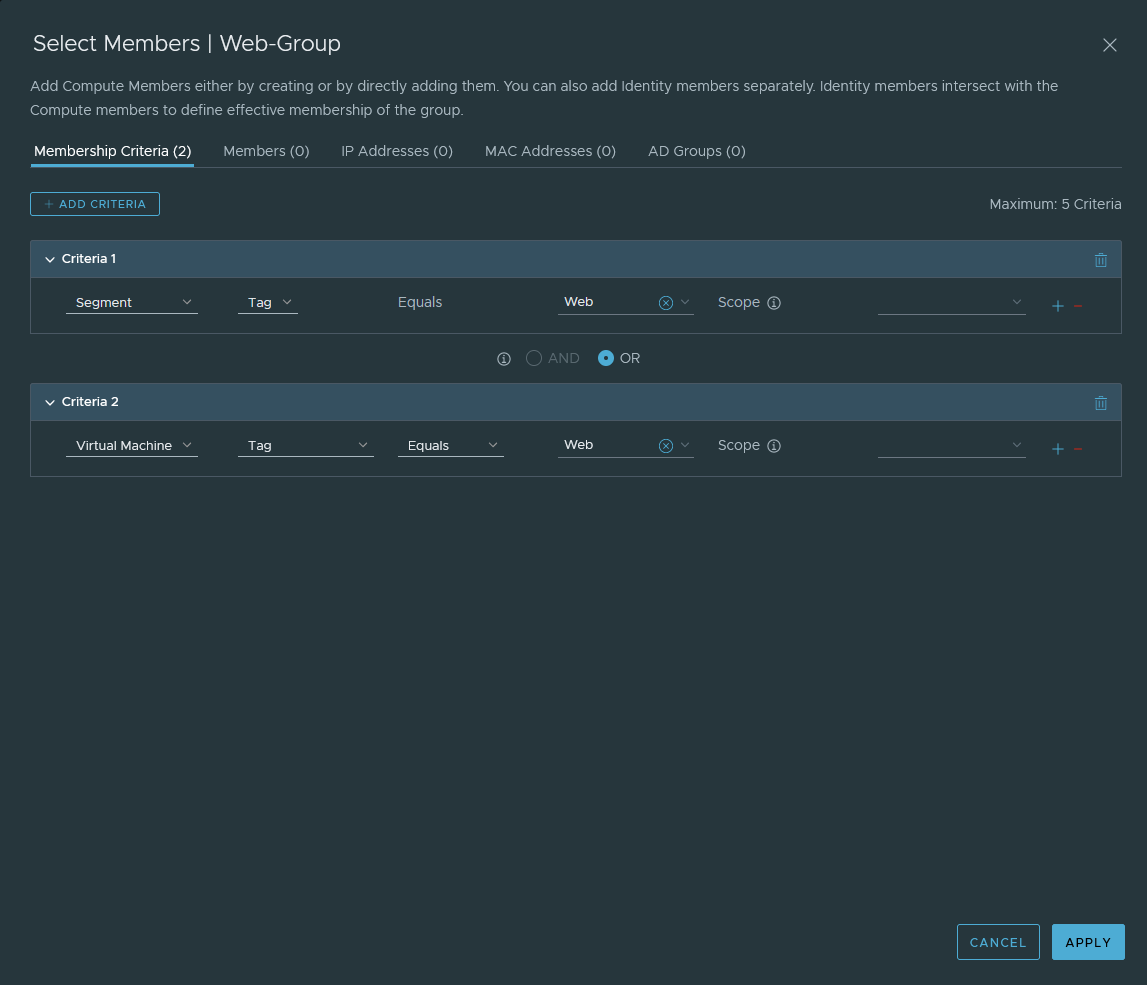
This reasoning behind all of this is so that we can use the groups as a source or as a destination in our policies. Also it allows us to create dynamic address group objects in Panorama to identify the IP addresses from our segments and use them in our security policies. The ‘Virtual Machine’ criteria is optional.
Adding a service chain and redirecting traffic to VM-Series
The security zone ‘EW-Zone’ we added earlier should show up under Security > Networking Introspection Settings > Service Profiles. Because we’re only working with a single security zone (PAN language, not NSXT language), we’re working primarily with intra-zone policies.

Head over to Service Chains and add one. Select the ‘EW-Zone’ as the Forward Path.

Next, configure a policy to redirect traffic to our VM-Series firewall. Security > East-West Security > Network Introspection (E-W). Do not edit the default policy. Add a rule above it, select the service chain we created earlier. Select the App, Web, Dev and IT groups as the source and destination and to where it’s applied to. This is the step that will define that our App/Web-group will be part of the ‘EW-Zone’ security zone in Panorama. The action should be redirect because we want all intra-VM traffic to be inspected by the VM-Series firewall.

Configuring security policies in Panorama
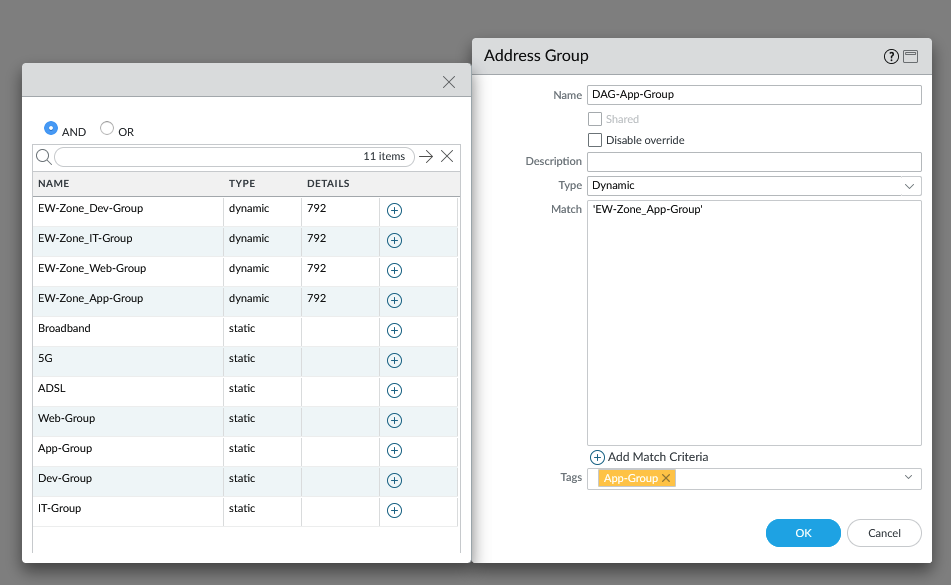
We should create dynamic address group objects for our segments because we are only working with a single security zone. Usually the default security policy ‘intrazone-default’ is set to ‘Allow’, but the action should be set to ‘Block’ instead. So having dynamic address group objects help us to distinguish traffic from our segments.
In Panorama head over to Objects > Address Groups. Add the following examples shown below. Repeat this process for each single segment. The use of tags can come in handy, but keep in mind that these tags aren’t from NSX-T.
Our security policies are as follow:

The action has been set to ‘Block’ for our default intrazone policy. Also logging has been enabled for both rules and a log forwarding profile has been added as well, so that Panorama receives the logs from the VM-Series. Keep in mind that the interzone policy will never be used because we’re only working with a single security zone. If we want to have multiple security zones then we have to add a new service chain, add segments to it and so on.
