QoS (Quality of Service) is used to prioritize certain type of traffic, configure how bandwidth is distributed, allocate a desired amount of performance for a given application or service. Palo Alto Networks makes it easier by leveraging App-ID, creating classes with bandwidth speed and priority, and lastly the use of policies.
Topology
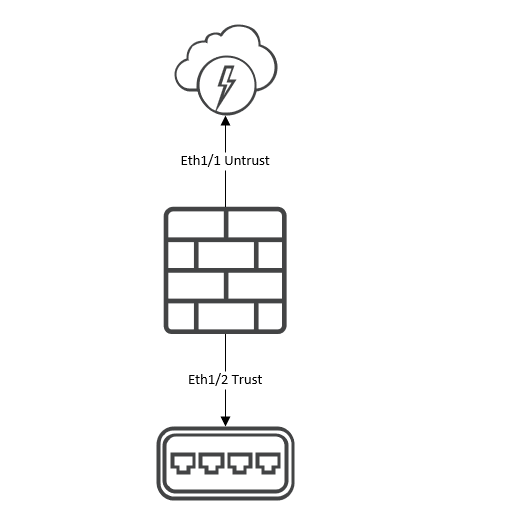
In the above, we can determine that we’re only using two network interfaces. The ‘Eth1/1 Untrust’ is the external facing interface (Internet) and the ‘Eth1/2 Trust’ is the internal facing interface. With QoS, we have to look at it from the perspective of the egress direction. That’s because QoS is applied on the egress interface.
For example, when we are uploading data from within the internal network to the internet, the egress interface is Eth1/1 which is the external facing interface. But when we are downloading data from the internet to the internal network, the egress interface is Eth1/2 which is the internal facing interface.
Lastly, the ISP down/up speeds are a maximum of 1 Gbps and 40 Mbps.
Configuration QoS
First, let’s start off with creating a profile that contains the classes and the priority/bandwidth details.
Network > Network Profiles > QoS Profiles > create a new one
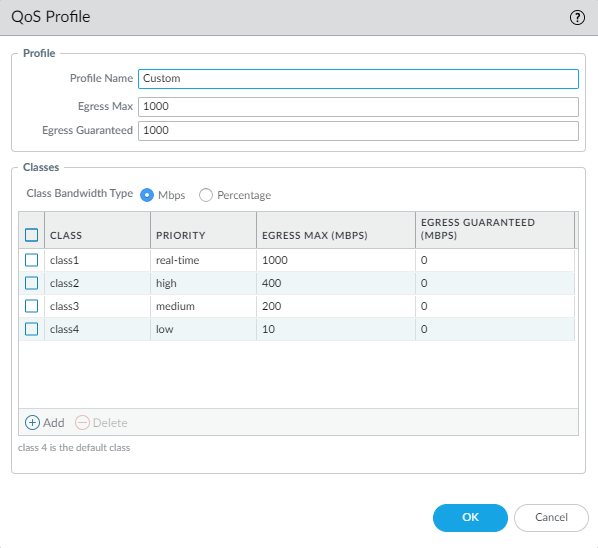
Name the profile. Create the classes, up to a maximum of 8 classes. Define the priority. Then define the egress maximum speed. Optionally, configure the ‘Egress Guaranteed’ setting. Which just means when the maximum speed cannot be reached, then that’s the value that will be guaranteed. For this demo, we won’t configure the ‘Egress Guaranteed’ setting.
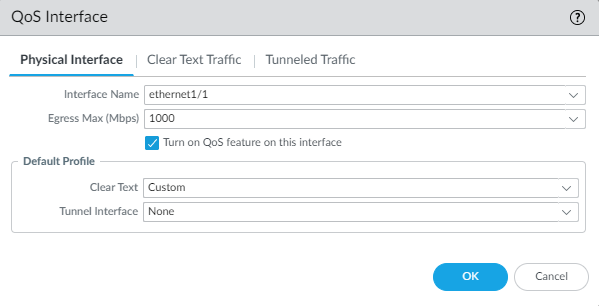
Next up, we’ll have to configure our physical interfaces for QoS.
Network > QoS
Starting off by adding the Eth1/1 interface, which will apply QoS against traffic that we’ll be uploading (outbound). Set the maximum to 1000 Mbps. Under the field ‘Clear Text’, select the QoS profile we created earlier. Then click OK.
Then repeat the same for the Eth1/2 interface, which will apply QoS against traffic that we’ll be downloading (inbound).
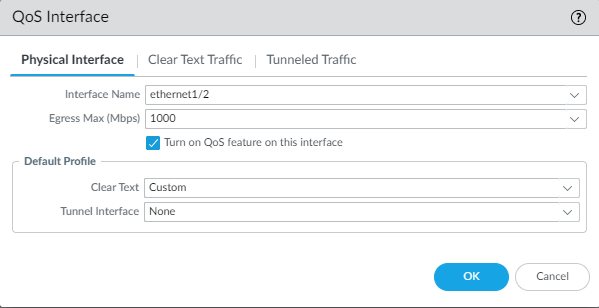
There’s no need to configure anything under the ‘Clear Text Traffic’ or ‘Tunnel Traffic’ tabs. That will override the QoS profile settings, which is not what we’re trying to do.
Creating QoS Policy
Next, we’ll create a QoS policy.
Policies > QoS policies
Simply create a policy with ‘Trust’ as the source zone and ‘Untrust’ as the destination zone. Then select the application ‘speedtest’, which will make it very convenient for testing. We’ve went with the 4th class, to throttle the speed down to 10 Mbps. The classes determine the speed and priority for a given application (in our case ‘speedtest’ is the application).

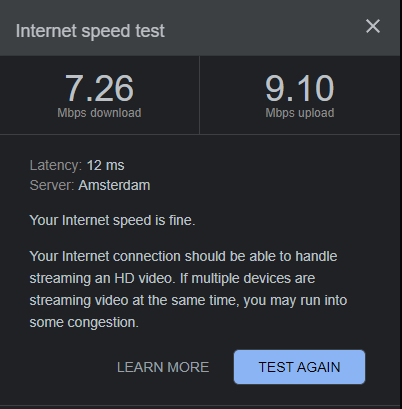
And when we run a simple speedtest, we can see that the download & upload speeds aren’t hitting above 10 Mbps.