Active/Passive HA configurations aren’t as complex as Active/Active HA setup simply because there’s no need to configure virtual IP addresses on any interface link. Load-balancing doesn’t have any relevance here because only a single device will be active at a given time. Once the Active/Primary device fails then the IP addresses and all of the configurations will move over to the second firewall.
HA interface types
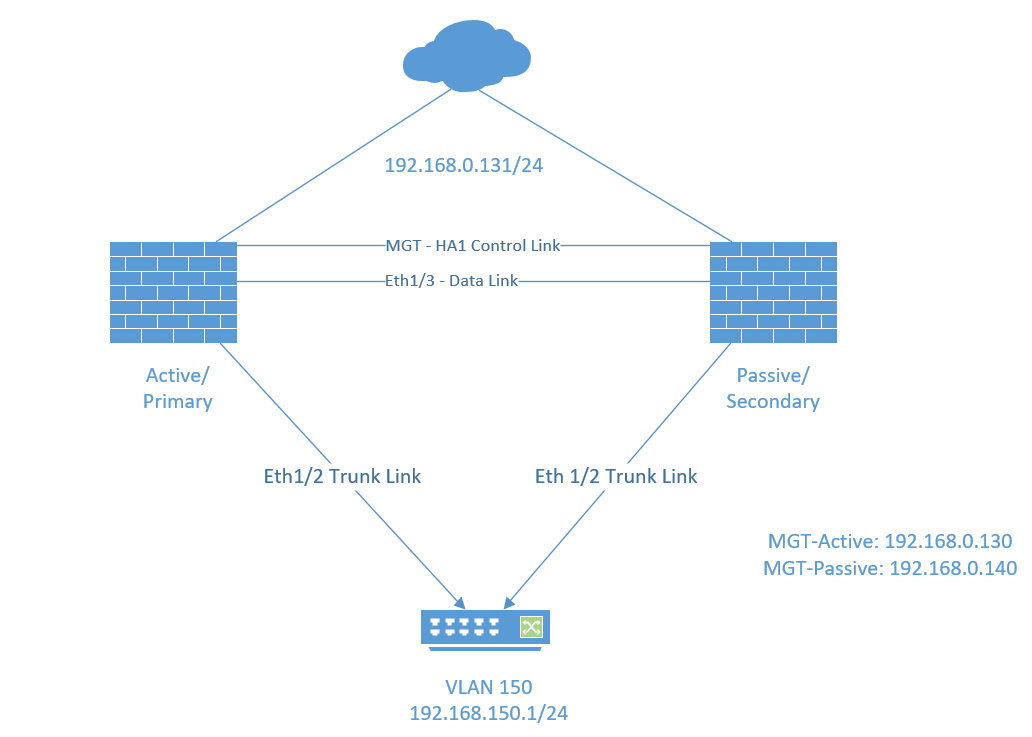
- HA1 also known as the “Control Link” basically synchronizes configurations between the devices. Usually the management interface is used for this HA interface. It has to be a Layer 3 interface and it doesn’t have to be in the same L2 domain.
- HA2 also known as the “Data Link” is used to synchronize sessions, ARP and forwarding tables. It can operate at Layer 2 so that it doesn’t need to be configured with an IP address. If both devices aren’t in the same L2 domain, then the HA2 interface should be configured with an IP address.
Prerequisites
This guide won’t explain how to set up a Palo Alto firewall so I won’t be going through every single installation process and I expect you to be intermediate at networking.
- Two Palo Alto firewalls
- Same model
- Same PAN-OS version
- Identical VM port groups (vSwitches or dSwitches)
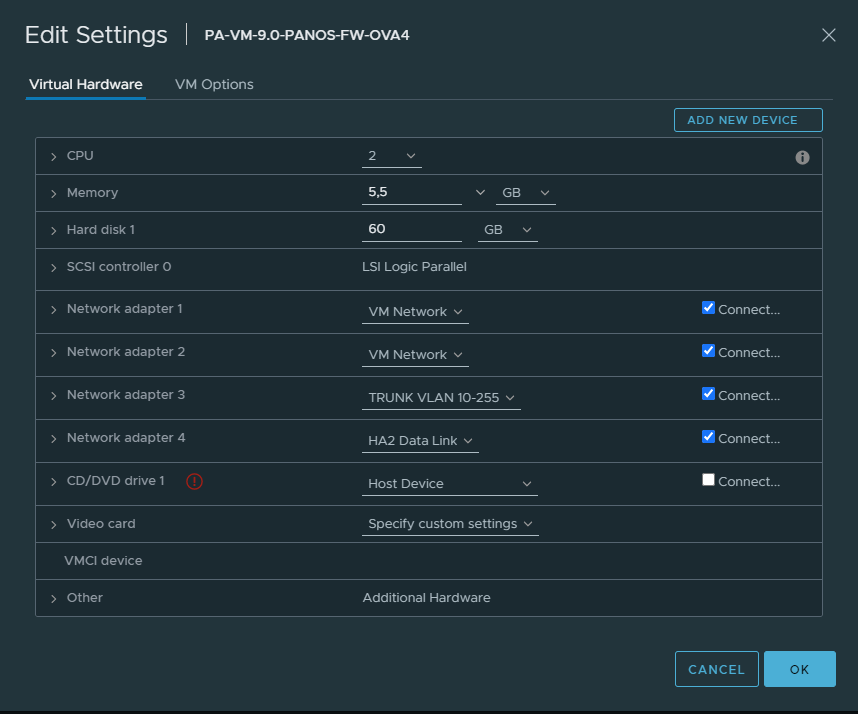
Virtual Machines Interfaces
In my case the VM Network port group is the management and the HA1 interface.
Active/Primary Firewall #1
Passive/Secondary Firewall #2
Interface within PAN-OS
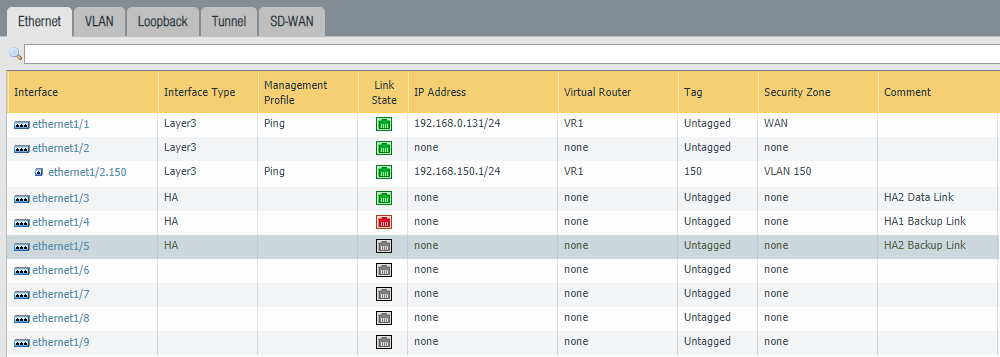
Active Firewall #1
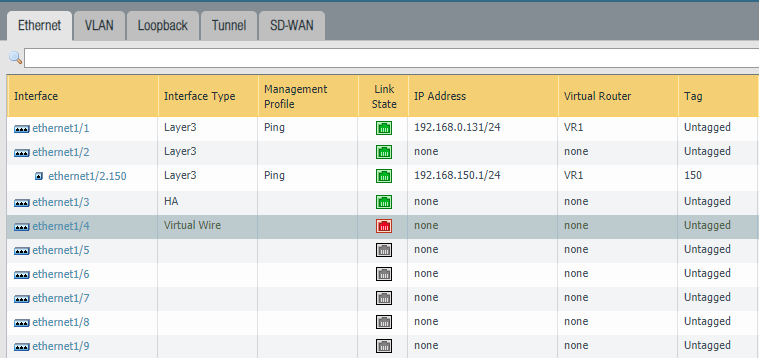
Configure Ethernet1/3 is configured as an “HA” type of an interface.
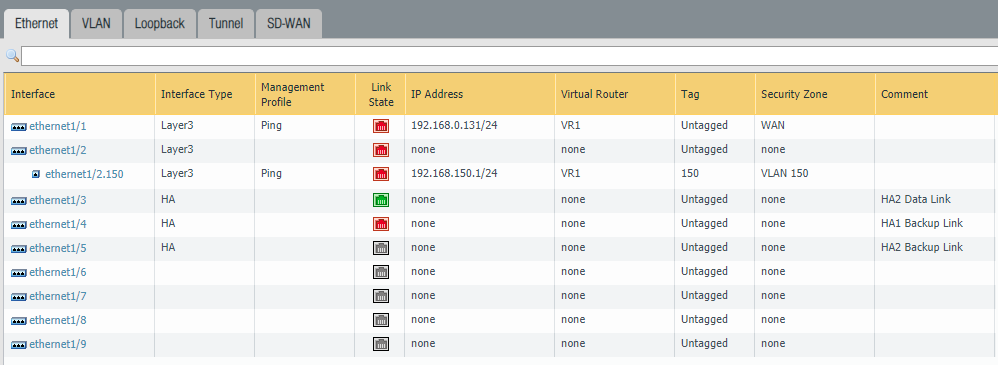
Passive Firewall #2
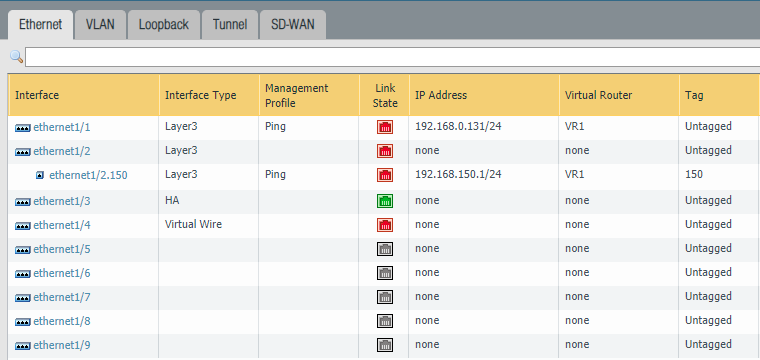
Again configure Ethernet1/3 as an HA type of an interface.
Device > High-Availability > General
Active Firewall #1
Make sure you configure the “Peer IP address” correctly. The address should be the Management IP address of the secondary firewall. Set the Group ID to 1. Device ID should be 0 which will indicate that this firewall is the primary.

Change the Device priority to 90 and select Pre-emptive. The HA-timer can be changed to a more aggressive setting, but recommended should be enough.

The HA1 Control Link should be set by default to the Management Interface, change it – if needed.

Select Interface “Ethernet 1/3” as the HA2 Data Link interface. No need to configure IP addresses because it’s a Layer 2 interface.

Passive Firewall #2
In its reverse! Set the Primary firewall’s Management IP address as the peer. Group ID should be identical as the peer, so it’s 1. Device ID should be set to 1 which makes this the secondary.

Select Pre-emptive and leave the device priority at default (100).

Make sure the Management Interface is the HA1 Link.

Select the interface “Ethernet 1/3” as the Data-Link interface.

Device > High-Availability > Link and Path Monitoring
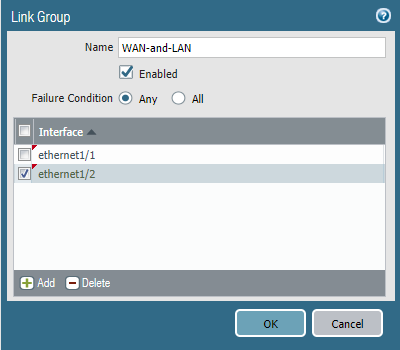
Defining the fail-over policy has to be configured individually at each device because it’s one of the settings that does not synchronize. Link Group only monitors the physical aspect like interfaces and cables. It can’t detect if there’s internet access or not.
Ethernet 1/1 (WAN) & Ethernet 1/2 (VLAN)
Path Group uses ICMP pings to a given destination to validate if there’s internet access or not. Highly recommended to select the Virtual Router as the object to monitor.

Optional: Import/Export HA Keys for encrypted HA1 traffic
HA1 communications can be encrypted by simply installing one device’s certificate on the other. Head over to Device > Certificates on both devices.
- Primary Device: Export HA Key > rename it to HAkeyPrimary.txt
- Secondary Device: Export HA Key > rename it to HAkeySecondary.txt
- Primary Device: Import HA Key “HAkeySecondary.txt”
- Secondary Device: Import HA Key “HAkeyPrimary.txt”
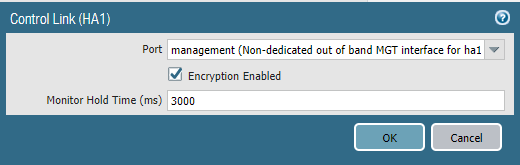
Device > High-availability > General > Control Link HA1
Finally, we have to check the box “Encryption Enabled”. Do this on each device because HA1 settings don’t synchronize.
Don’t forget to delete the keys from your workstation.
Optional: Backup Links for HA1 & HA2
Redundancy for physical links in case of any failures is always good practice. You’ll need to create two new portgroups on ESXI for HA1 and HA2. Then add them to the virtual machines.
Active Firewall HA1 backup IP address: 192.168.255.1/30
Passive Firewall HA1 backup IP address: 192.168.255.2/30
Firewall Interface configurations
Active Firewall #1
Select “HA” as the type of interface for Ethernet 1/4 (HA1 Backup Link) and Ethernet 1/5 (HA2 Backup Link)
Configure the HA1 Backup Link. Select Ethernet 1/4 as the interface. Fill in the IP address/netmask. There isn’t a need of a default gateway because it’s just two devices communicating with each other.

Configure the HA2 Backup Link. Select Ethernet 1/5 as the interface and again because it’s a layer 2 interface we don’t need IP addresses.

Add the back-up peer IP (192.168.255.2) address of the passive firewall.

Passive Firewall #2
Select “HA” as the type of interface for Ethernet 1/4 (HA1 Backup Link) and Ethernet 1/5 (HA2 Backup Link).
Configure the HA1 Backup Link. Select Ethernet 1/4 as the interface. Fill in the IP address/netmask.

Configure the HA2 Backup Link. Select Ethernet 1/5 as the interface and again because it’s a layer 2 interface we don’t need IP addresses.
Add the back-up peer IP address (192.168.255.1) of the active firewall.

Conclusion
At this point everything should be up and running. For a proper overview and to monitoring the HA-setup enable the High-Availability Widget on the dashboard.
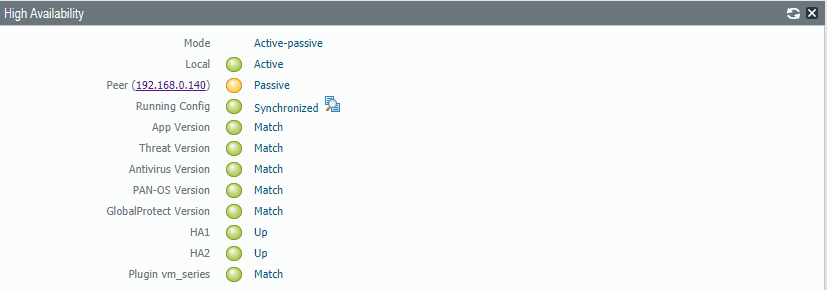

The running config can be forced to synchronize with the passive firewall by clicking the glasses icon. Never synchronize from the passive to the active firewall.
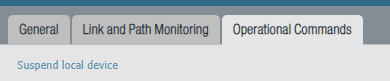
Under Device > High-Availability > Operational commands – we can suspend devices (or make them functional again) to test if High-Availability is working as intended.